The Flipnic guide
So, you want master Flipnic? Here's a guide that tells you everything you need to know.
In-game help
This game has built-in help videos, which you should watch before reading this guide. They cover some of the basics, such as the controls, the concept of missions, pinball techniques, etc.
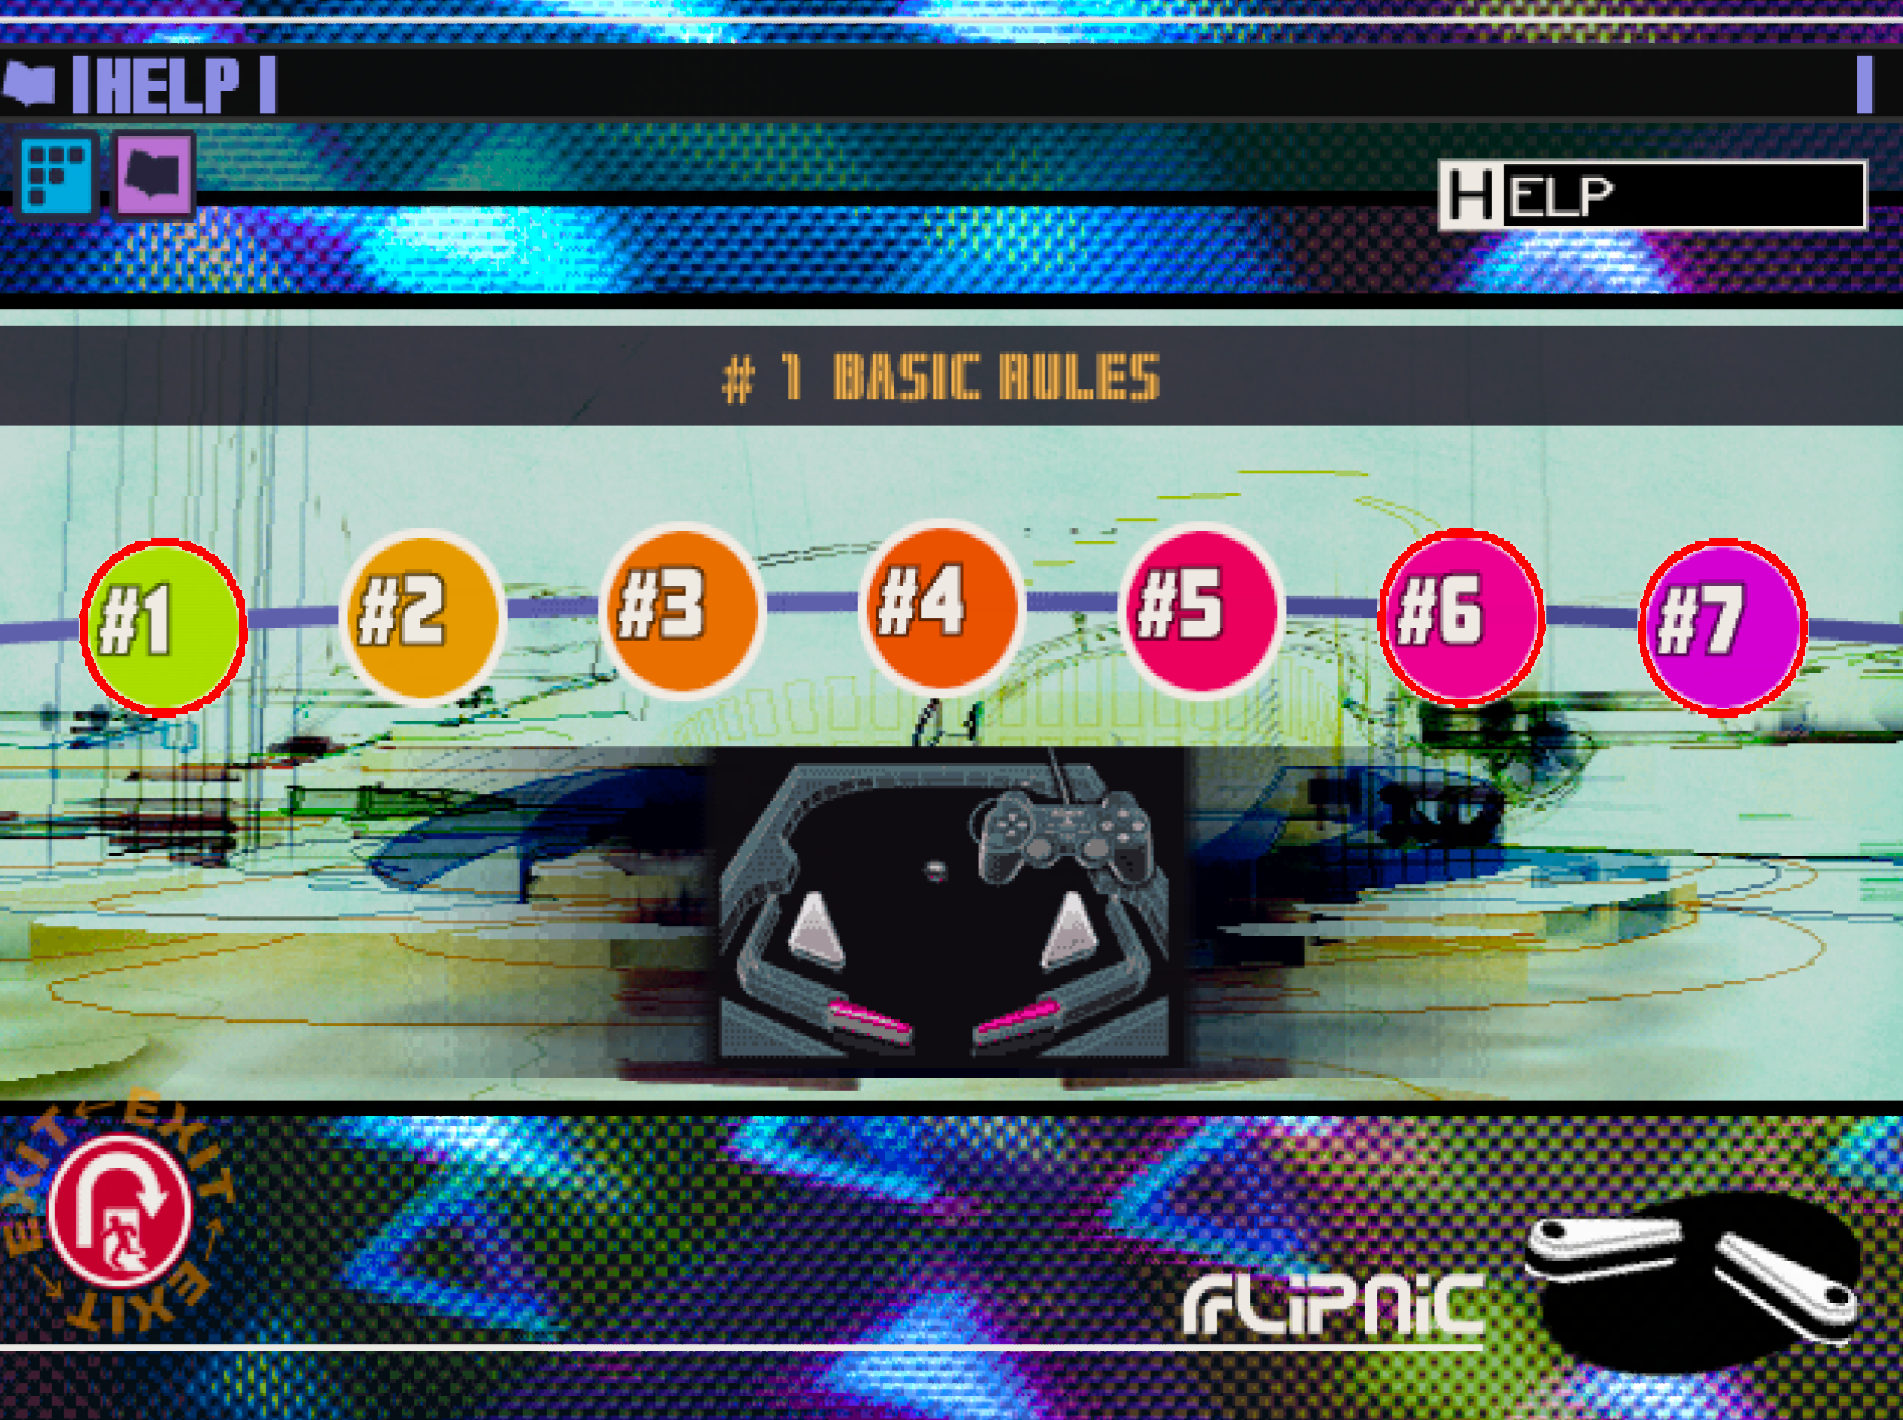
To access it, in the game menu select the HELP option (in NTSC-J version it's also called the EXPLAIN menu). At a minimum you should watch the folowing chapters:
1 Basic Rules
6 Defence & Offence
7 Holding
Game modes
So, when you are playing the game for the very first time, you actually have a couple choices on how you're going to play the game.

ORIGINAL GAME - This is the main game mode, where you unlock the stages and reach the credits if you beat the last one by completing (almost) allred missions (we'll come back to this later). Each stage can have a color and description associated with it:[
Green ] OK - This is the stage you should play now if you want to unlock more stages and increase the total score.[
Green ]Played - The stage has been cleared, however you didn't complete every single mission yet, so you can replay the stage to complete those missions. However, the total score will not increase after playing the stage.[
Green ]Excellent - You have completed every mission on this stage and there is no reason to play the stage again unless you clear the original game progress.[
Yellow ]Sample - If a stage is marked with an orange/yellow color, that means it isn't fully unlocked yet, however you can practice on the stage for 5 minutes and after the time runs out, a game over cutscene is played and you're returned to the main menu. For NTSC-J region, Metallurgy A and Optics A are the only stages to have the demo option, in other regions Geometry A can also be played in demo mode. Despite displaying the score on the top left, your total score will not increase in this mode.[
Gray ]Cannot select - The stage is locked and not even a demo mode is available. You have to complete red missions on a previous stage to unlock it (or use cheats).

FREE PLAY - This mode lets you play any stage you have unlocked from the original game mode. The colors of the stages have similar meaning to original game. There are 2 submodes: SCORE ATTACK and TIME ATTACK.SCORE ATTACK - In score attack you try to reach the highest possible score with the limited set of balls. Note that you don't have any extra credits and the developers don't intend you to get any extra credits during gameplay in this gamemode (though there are ways to glitch spawn a yellow UFO).
TIME ATTACK - Similar to demo stages in original mode, except you have twice the amount of time. Again, you are aiming to get the highest score, however the threshold for getting on the scoreboard is actually much lower in this mode due to the limited time.
2P MATCH - In the same menu as free play, you see stages marked with acyan and sometimesorange colors. These are ball games themed after the main stages designed for 2 players. If a stage isorange , it means you can only play it for 1 minute until you complete the corresponding original game stage it's themed after. Every level has a different gameplay mechanic.
Foosball Striker (Biology) - Player 1 is red, Player 2 is blue. The idea is similar to soccer, except you control bumpers with the
CIRCLE button corresponding to your team color. The game has a time limit of 5 minutes, the objective is to collect 5 points for your team. Special rules:Ball getting stopped triggers a foul, which resets it to the spawn point and no points are given or taken
If both players have the same number of points after the time is up, the game ends with a draw

Basketball 1on1 (Metallurgy) - Player 1 is red, Player 2 is blue. Both players have their own set of flippers and try to guide the ball into a basket corresponding to their team. The end goal is to reach 10 points before the time runs out. Special rules:
Should the ball fall into the outhole, it gets respawned to the center
A re-spawned ball can be fired by either player
Guiding your ball to another player's goal gives them the point

VS. Bagatelle (Optics) - Player 1 is pink, Player 2 is blue. Both players have a flipper they can control as well as a bunch of bumpers, which they can control if they correspond to their team color. Flipper and bumpers are controlled by pressing the
CIRCLE button with the right timing. The aim is to move the ball to your opponents outhole (i.e. bottom of the screen on their side). The game ends when one of the players reaches 10 points or the time runs out. Tips:Try to avoid a situation where the ball falls below the center area on your side, since that's the riskiest position to be in
There is a tunnel at the top of the game board, which the opponent can't influence, but it's also much harder to reach
If you let your own balls fall, you still lose points, so try to avoid that 100%
Triple Paddle (Geometry) - Player 1 is
pink , Player 2 iscyan . Both players have 2 paddles on their side and 1 paddle on the opposition side. A ball can be launched with aCIRCLE button and paddles can be controlled either by using the analog stick with a circular movement or the Up/Down directional pad buttons. Pink is trying to get to the cyan area and blue is trying to get to the red area. Should either player reach that area, a point is scored. The player who reaches 10 points or the most points before the time runs out wins the game. Tips:The paddle on the opposition side can't deflect the ball to your side, it can only guide the ball forward, so you should always try to aim it towards the ball
If you're feeling silly, you can flick the analog stick up and down repeatedly to make it nearly impossible for your opponent to win (yeah, that's how broken this game is lol)
Your first objective when you play the game for the first time should be to complete all the

Difficulty levels
You can play the game in one of the following difficulty levels:
Easy (default)
5 balls
5 credits
All ball saving bumpers
0 additional target hits
Normal
3 balls
2 credits
1 ball saving bumper
2 additional target hits
Hard
3 balls
1 credit
0 ball saving bumpers
3+ additional target hits
Generally I recommend playing in Easy mode if you're a beginner, Normal if you feel like you're comfortable with Easy and want a bit of a challenge and Hard if you feel like you've mastered this game and want a hardcore experience.
When you run out of balls, in Easy and Normal mode you have the option to continue the game (if you're playing original game). However, this decreses your credit count. So if you reach your final credit and you lose all balls, the game is over. In Hard mode, you already only have 1 credit and the game ends immediately as soon as you lose all balls.
However, there's a way to prevent your ball from falling off. And that is to use something called ball saving bumpers, which are blue shining bumpers that bounce the ball back, however doing this will deactivate them. To reactivate them, you must hit a blue marker, which will spawn a blue coin, which if you collect it, it reactivates one of those bumpers. You can control the position of them by pressing the
The last parameter that the difficulty level changes is the number of targets you need to hit to complete various missions. For example, to complete Freeze Over mission, you need to hit bumpers in a specific area to get the butterflies to spawn. But in Normal and Hard difficulties you have to do that more than once per bumper, making it more difficult to complete the mission.
Stage unlock guide
The following sections detail how to unlock every single stage in this game. By the nature of this guide, it will contain spoilers, so be ready for that. Make sure you complete these stages in
Biology A
Required missions (Green = Started/Cyan = Completed):
Freeze Over Hidden Path Discovery Zero Gravity
As you may have noticed, Zero Gravity was marked with green in this guide, which means to complete the stage you need to at least start the mission, you don't have to finish it to complete the stage.
Beginning

After selecting the stage and pressing GAME START, a cutscene of a drop of silver is displayed. Wait for it to finish. The stage starts with your ball falling from space into the spawn area. Press
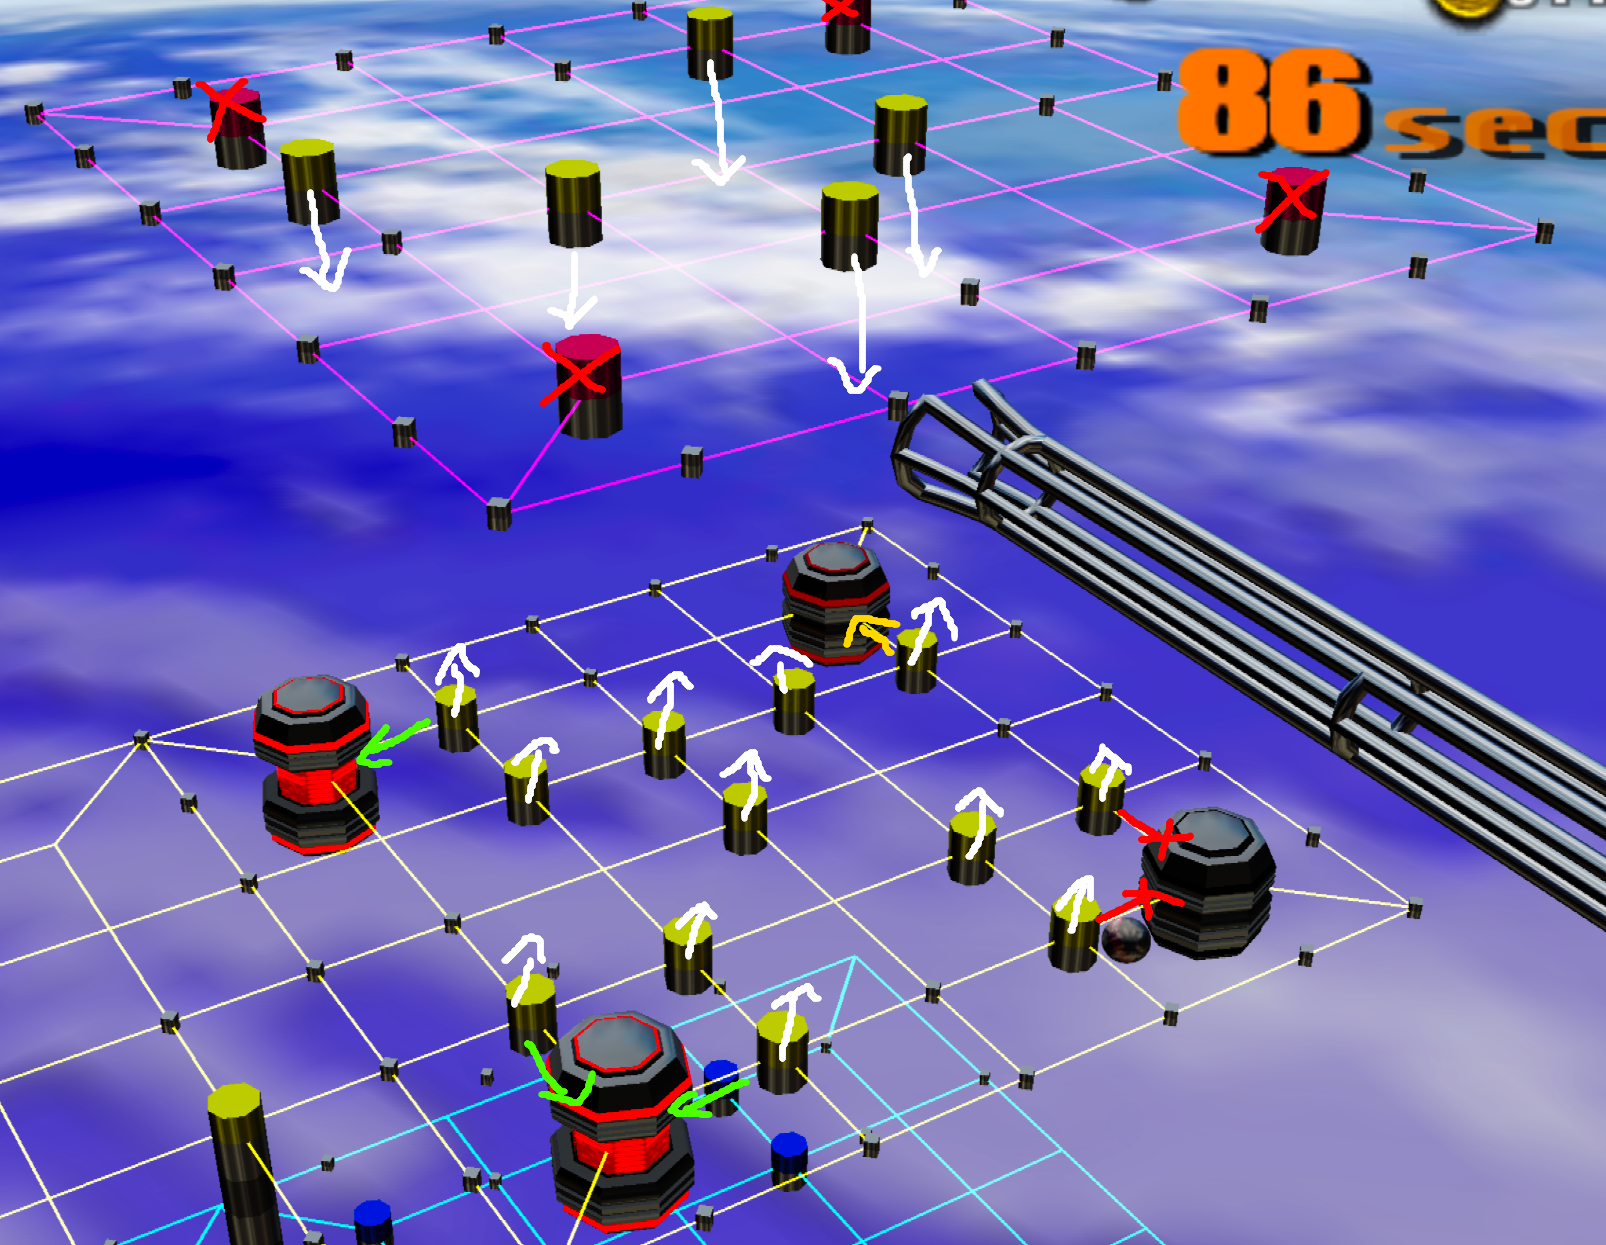
Bumper area
Since we're just trying to complete the stage, you don't have to actually complete this mission, however, you can give it your best effort if you want. Basically your goal is to hit every bumper marked with an orange arrow. You can control the levels of various bumpers by pressing the
If you manage to complete this mission, a "Congratulations" cutscene will play and you're awarded bonus points. It may even play twice if you manage to do this on the first try (so-called "Perfect Bumper Village").
You will inevitably fall down the waterfall and continue to the next area.
Slot chance!
So this is the main sort of hub of this stage that lets you go to various areas. Don't worry about the slot machine at the moment, just know that if you happen to hit the three bumpers on the waterfall, a certain icon will be displayed on the slot machine and if three of them match, you activate a mini-game. A "WILD" icon is a wildcard, meaning it can match with any other icon.
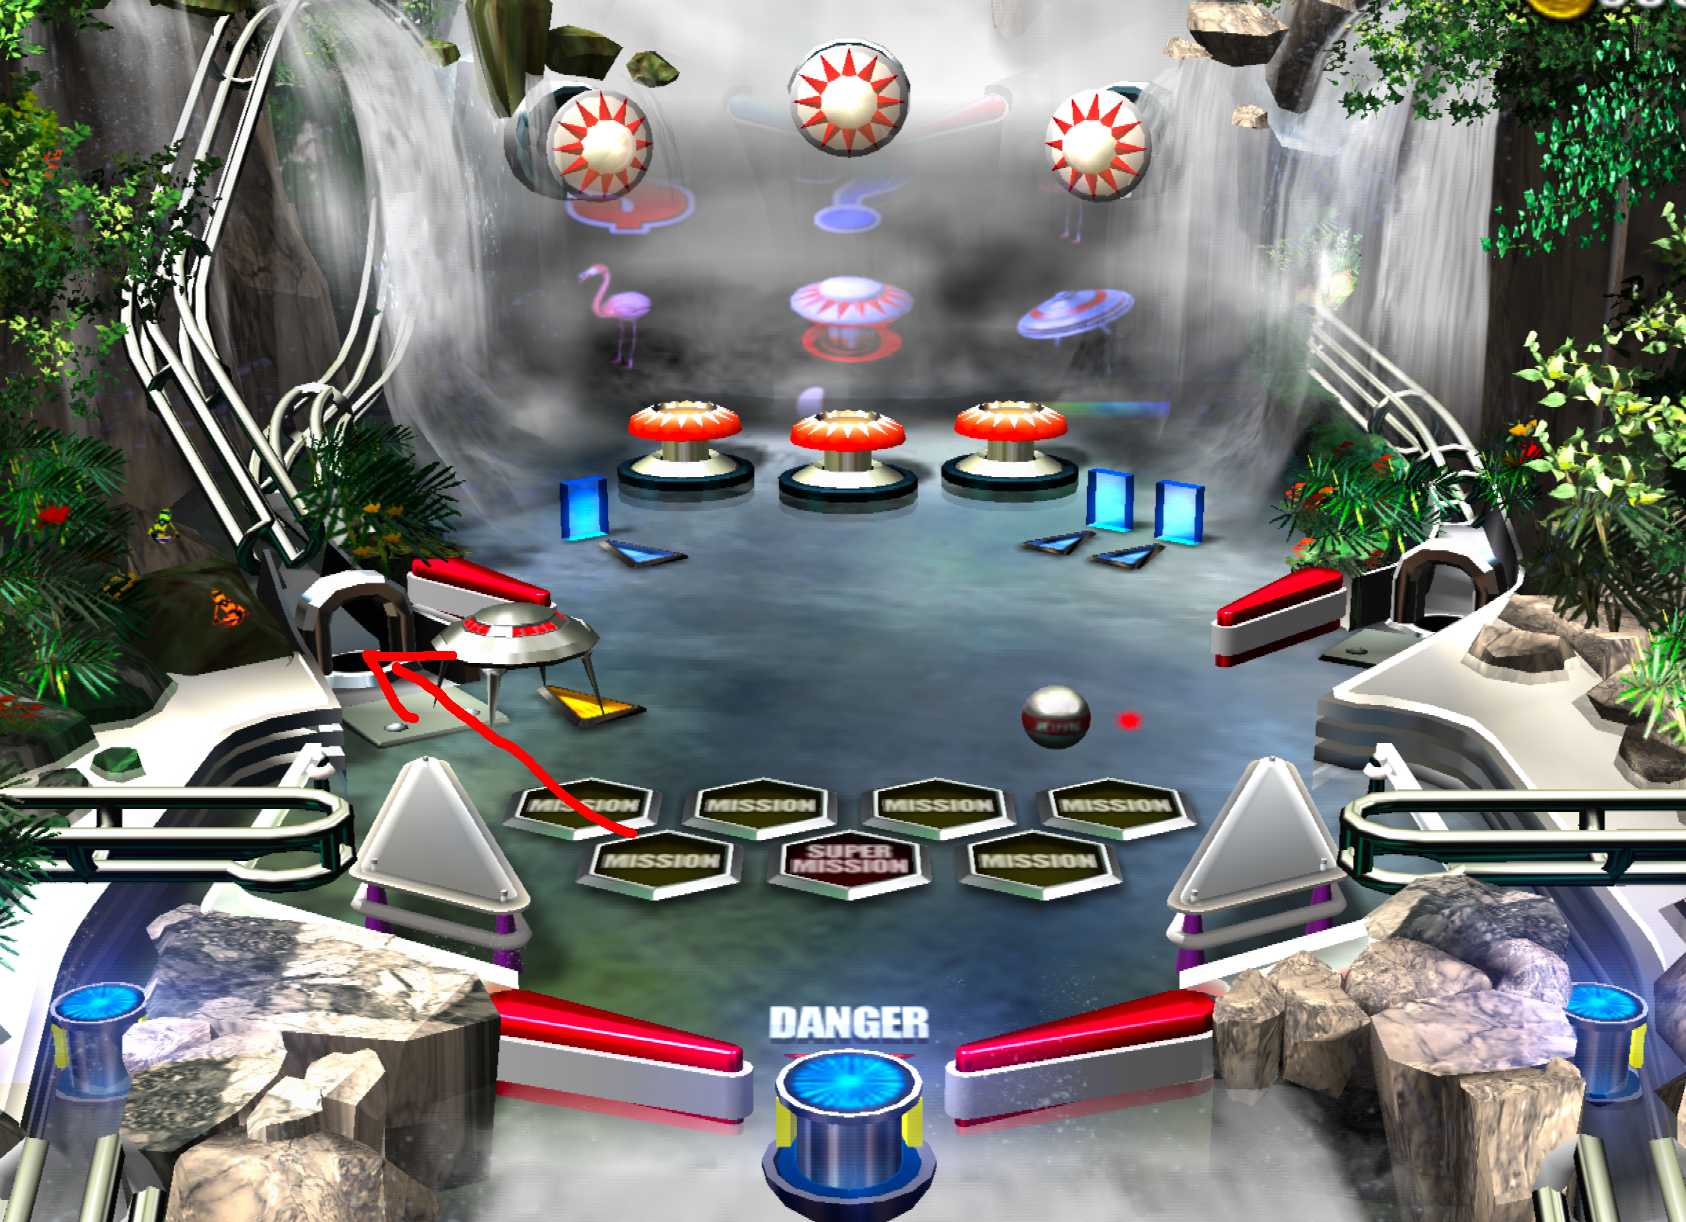
To progress, you must aim for the
Transition area
So once you confirm that you want to go through the lane, the camera will follow the ball and you can collect coins. Press

So basically, you have to time it right to get through the lane at the right. The secret is to let your ball fall right to the bottom edge of the flipper and then press
Butterfly area
And now it's finally time to try our hands at completing the first mission in the game! After a short transition, you'll be taken to the butterfly area. Here you have 5 bumpers. You need to hit all of them, which will make butterflies land on them. Do not hit the spinning red/blue bumper on the right, as that will cause one of the butterflies to get eaten.
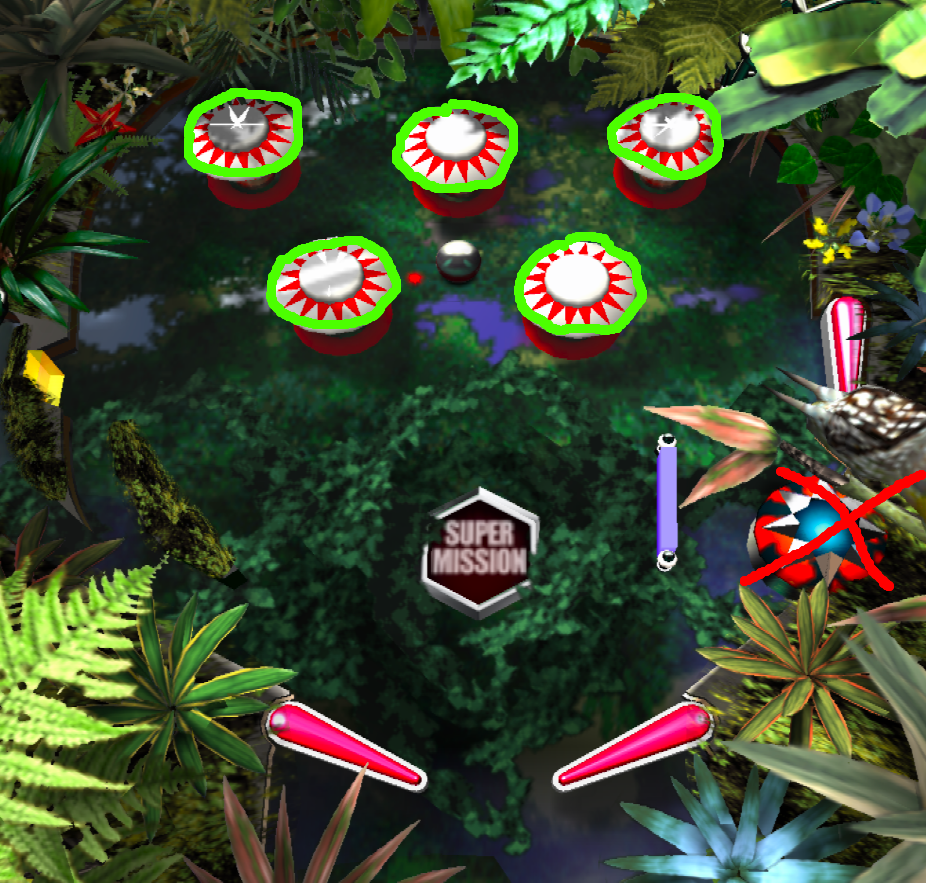
If you manage to hit all the bumpers, you trigger a freeze over and the next phase of the stage will begin. If you let the ball fall, you're taken all the way back to the slot chance area and have to traverse back here (see Transition area).
Freeze over
So after triggering a FREEZE OVER, a cutscene will play and everything on the stage will get frosted (with exceptions) plus you get massive amount of bonus points. At this point, you can exit the butterfly area and go back to the slot chance area.
You'll notice that the area is very different now and there are two ramps pointing at the frozen waterfall/ice mountain. You need to use those two ramps to guide the ball into hitting the frozen waterfall a certain number of times (Easy: 3, Normal: 5, Hard: 7).

Once you do this, you trigger the final mission of the stage - Hidden Path Discovery.
Hidden Path Discovery
This is the hardest mission of the stage you need to complete. You need to use the flippers on the now unfrosted mountain to collect all coins, which spawn at increasingly higher altitudes.
Some tips:
Double flipping (i.e. hitting both flippers at the same time) makes this mission impossible, so don't do it, try to only use 1 flipper at a time
Red flipper corresponds to
CIRCLE and blue flipper corresponds toLEFT , no matter where they are locatedTry to catch the ball with one of the flippers, this will make it significantly easier to aim the ball
Once you reach the part where a blue flipper is blocking the way, you need to hold the
LEFT button to let the ball through

Once you collect the coins at the very top, you complete the mission and transport to the Zero Gravity area.
Zero Gravity
This is the final mission of most stages. You have a time limit of 60 seconds and you need to hit the projectiles with your ball. Doing so will make them increasingly more red and eventually scatter them until they form a new pattern. You need to repeatedly destroy these patterns until the projectiles turn into a cube.

Some tips:
You actually don't have to fully complete this mission, so don't feel stressed out, you're just doing this for bonus points
You can use the near right gravity bumper to increase your elevation and near
LEFT one to decrease the elevationThe second to last pattern is a stick figure, following by a mix of all the previous patterns
If you don't manage to complete this mission, you get awarded no bonus points, but you still unlock the next stage. Otherwise, you see a congratulations cutscene and get massive amount of bonus points.
Post-completion
Once you complete a stage in this game, you're transported back out of the zero gravity area and you can redo all missions or get ones which you didn't get before. This is your last chance to increase the score before selecting another stage.
If you just want to complete the stage and don't care about the score, you can press START to bring up the pause menu and quit at this point.
Once you do that, you're prompted to save the game (you should do that) and then you should see the stage selection screen with a newly unlocked stage - Evolution A. You should also see that your total score has increased.
You can go back to Biology A and see the stage status with all of the missions you managed to complete if you want. If you're ready, you can start the Biology A stage, which is the first boss in this game.
Boss stages (Evolution A/B/C/D)
Required missions
Complete The Stage
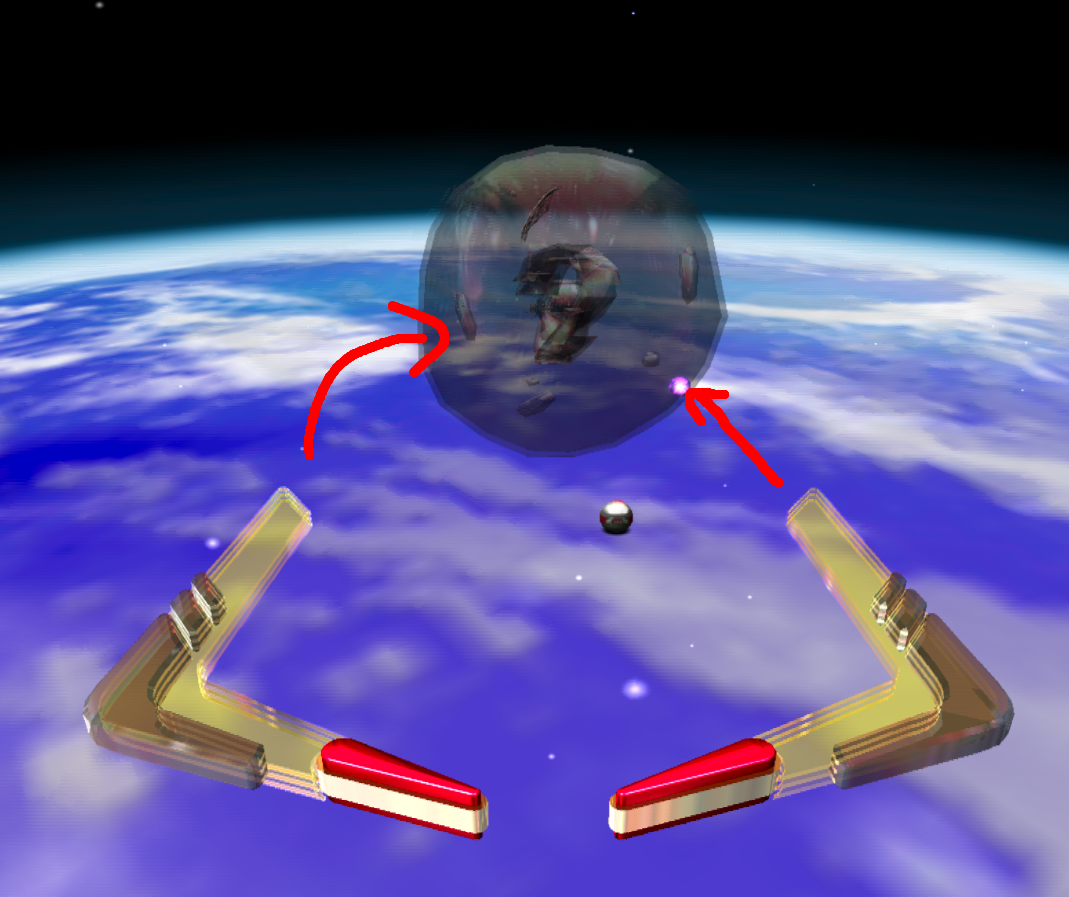
One boss stage, you get spawned in the middle of space with two flippers and a flying object. Hit that object 1-4 times and it'll turn into something else. Repeat these steps until you see a red skull.
If a red skull appears, that's your final target, however it'll be more difficult to hit, because it shoots projectiles, which stunyour flippers temporarily. If you time it perfectly, you can bounce the projectiles back however.
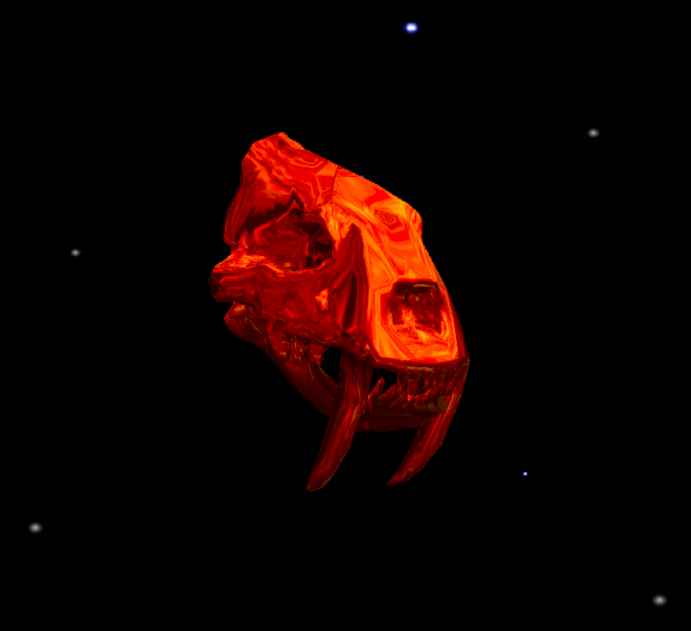
Usually you need to hit the skull 1-4 times for it to get destroyed, however if that doesn't happen, that means you need to wait for the skull to transform back into another object and hit that instead.
TIP: If you hit a shining purple target, it spawns another ball. You can have up to 3 balls on the board at once.
Once you destroy the red skull, the stage is cleared. Clearing the stage doesn't increase your score (with exceptions), however it will unlock the next stage and the corresponding Evolution stage will be marked as having all missions cleared. Note that you can't view stage status for Evolution stages.
Metallurgy A
Required missions:
Move On 1 Move On 2 Spider Crab Shoot-Down Stop The Four Shafts 1 Stop The Four Shafts 2 Zero Gravity
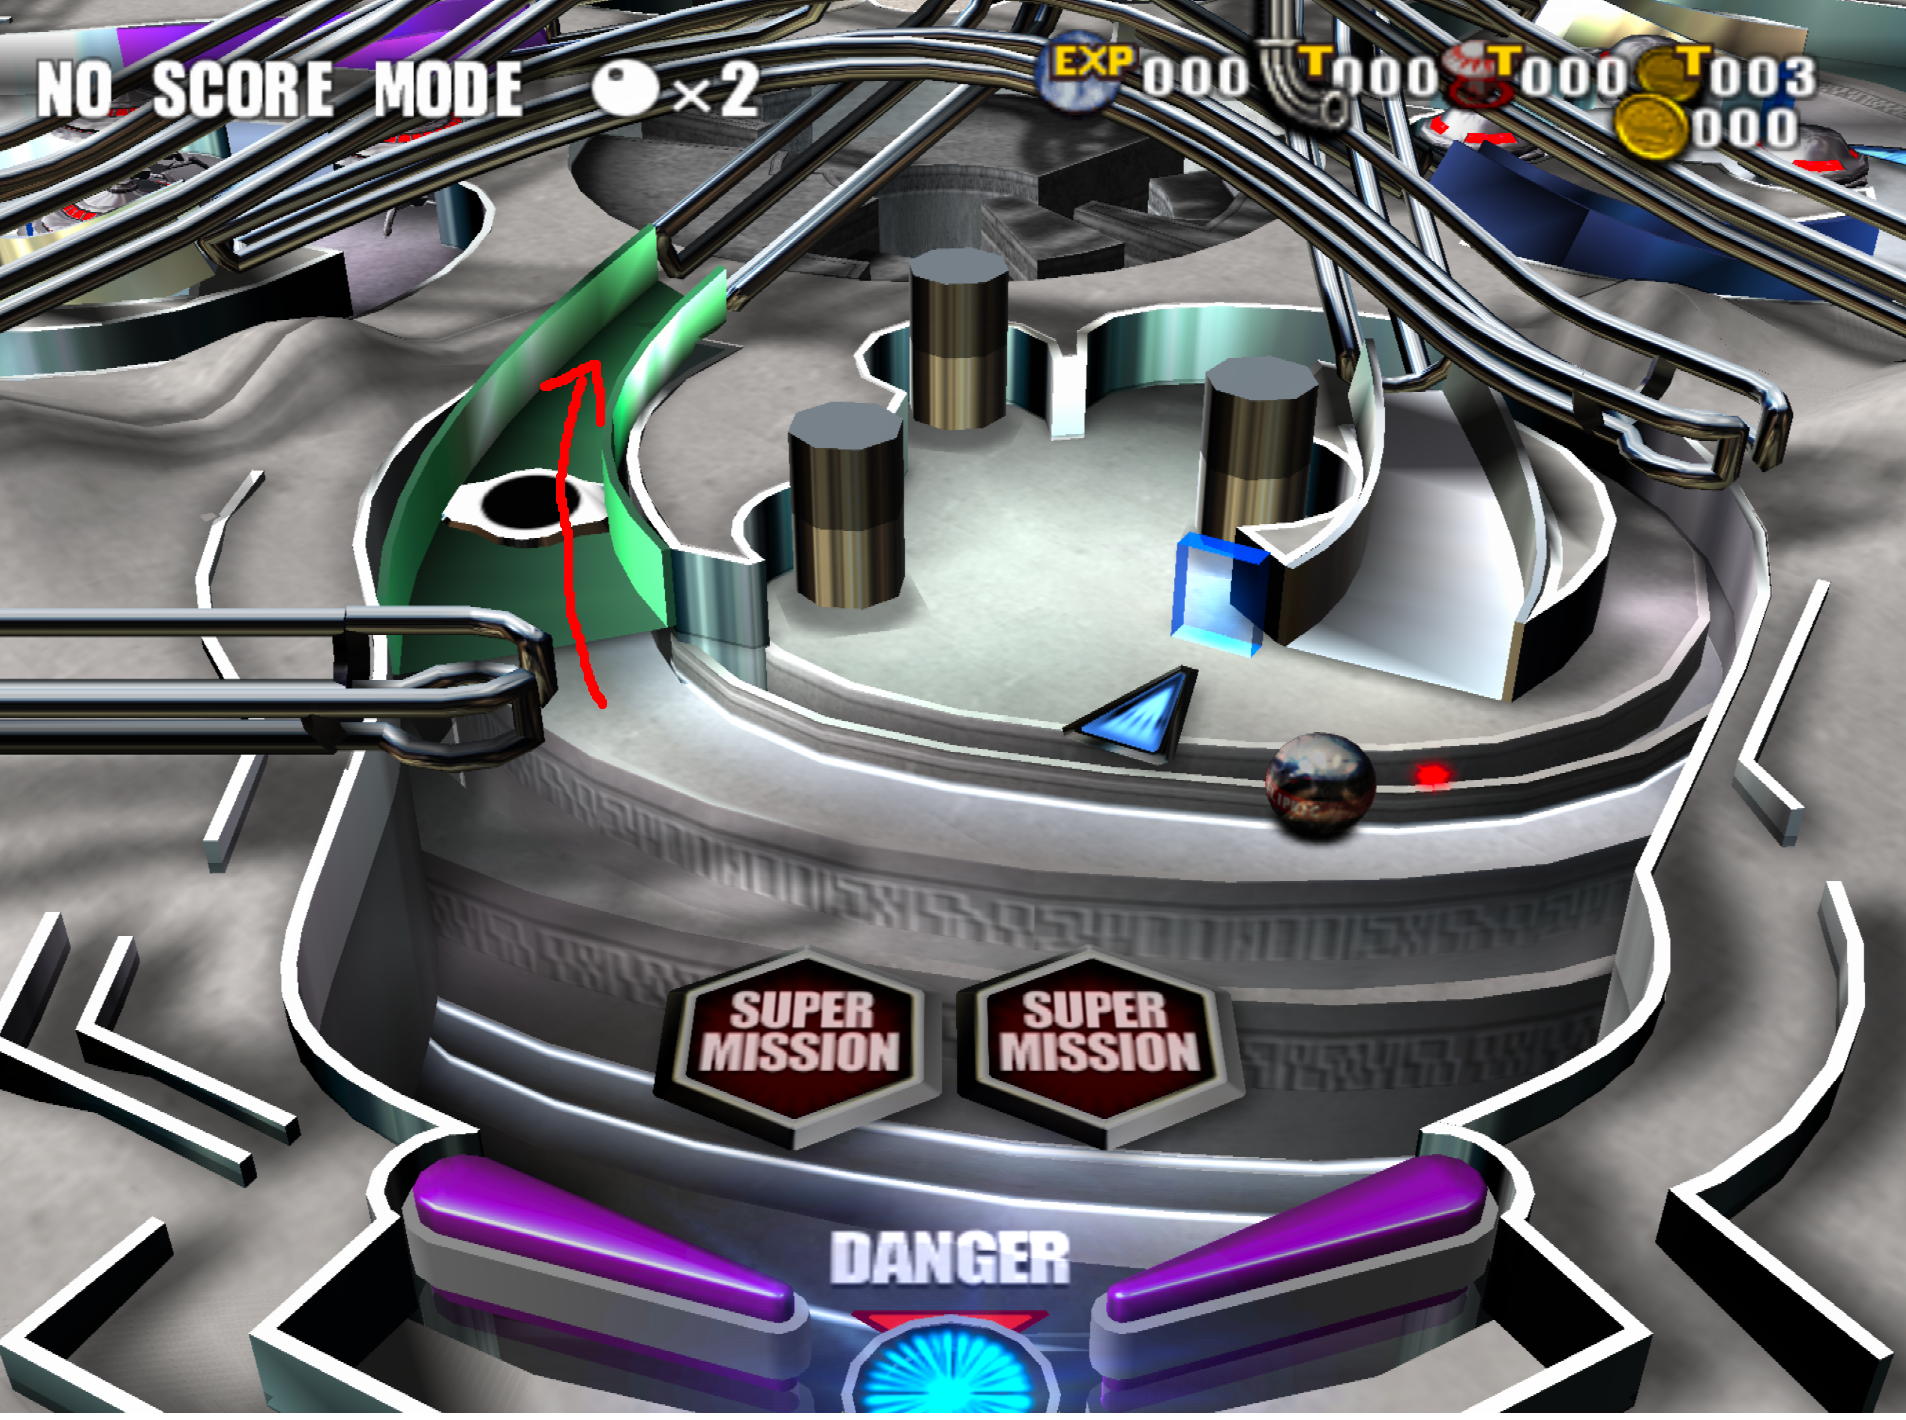
Central area

The stage starts at a central area, where you can go to other parts of the stage. By going through right lane, you can go to the next quarter of the central area.
The beginning has a tower bumper blocking the entrance to the final area of the stage. You can only lower it by raising the three tower bumpers in the middle, which happens when you complete the various red missions.
Stop The Four Shafts
So my recommendation if you are a beginner is to start with the four shaft missions, because if you clear them, you can make the rest of the stage a bit easier.
Navigate to the next quarter of the central area by going through the right lane. You should see a lane on the left marked with
You should now see a
Spawn -> Stop The Four Shafts 1
- FFRBRFFDRBLFLFRFL!B!RBRFU

Spawn -> Stop The Four Shafts 2
- FFRRBRBBLFR!FDL!BLBRRRRFFU


Stop The Four Shafts 1 -> Teleporter
- DF
Stop The Four Shafts 2 -> Teleporter
- DBBLF
Stop The Four Shafts 1 -> Stop The Four Shafts 2
- UHBRB!F!LFL!FDRDLB!RBBRUBBL!LDBBBBRRFU
Key:
F = Forward
L = Left
R = Right
B = Backward
D = Down (elevator)
U = Up (elevator)
! = Caution/Wait for path clear
H = Lane/Habitrail
Once you're where you need to be, you should see 4 red shafts that open and close at certain intervals. Hit one of these open shafts and time will start counting down. You need to hit all four shafts repeatedly until they shut off and close. You damage a shaft that is closed, you have to wait until they open.
Sometimes certain poles will go up and down making it more challenging to navigate (this may include the one your spinning around). If you're on the top part navigate where you need to be and then wait until you get back down. You should not go to the pink poles, as they will never come back down.
Tips:
Always try to stay near a shaft. If you need to navigate, do it as quickly as possible.
If you manage to destroy all shafts you get a buff, either the big UFO will no longer shoot lasers at you or the spider crab becomes much easier to destroy (dep. on the specific stop the four shafts mission). So you definitely want to clear these missions even if it's strictly not neccessary for you to do so.
You can use teleporters to go back to the central area instantly (saves time and reduces the room for error).
While you can go directly from shaft area 1 to 2, I still recommend using teleporters and navigating from spawn, because the chances of falling into the void are greatly reduced.
If a shaft is sleeping, you can continue hitting it. While it doesn't do any damage, it guarantees an instant hit once it wakes up.
While navigating, if a path isn't clear, you can shoot the ball repeatedly into a direction and eventually some poles will fall, so you get closer to where you want to be much quicker. This also helps prevent a situation where you get the pole you're standing on pulled up, because technically, while you are moving, you're not standing on anything.
Spider crab shoot-down
Once you return from the pole maze, you can take the right lane and you should end up in the quarter of the central area with a
Catch and hold the ball with the right flipper and wait for the spider crab and all the minions (crab babies) to fully spawn. Once they have fully spawned, start attacking the spider crab with your ball. It has a health bar that starts depleting when you hit the spider crab.

Tips:
If you see purple crab babies, hit them. This will start a special multiball mode, which can help you defeat the spider crab much quicker
You can hit the right wall repeatedly to damage it. Once it's broken, it's going to fall on the spider crab and cause massive damage.
The spider crab may run away. At this point you have 2 options - lose a ball or follow the spider crab. If you choose to lose the ball, the spider crab will respawn instantly with the same amount of health. If you choose to follow the enemy, take one of the outer lanes. However, keep in mind you need to get back if you want to eventually get out of this area.

Once you destroy the spider crab, you get bonus points and you are free to exit the area. To exit the are, take the middle-right lane (next to right lane). If you wait too long, crab babies will spawn and block your way.
Move On
Once you exit the spider crab area, you are back at the central area, specifically at the quarter with a
You should end up in an area with a big UFO that may or may not be shooting lasers at you. If a laser hits your ball, it misdirects your ball slightly.
Anyway, the goal of the Move On missions is to hit the purple circuit board multitple times (marked with a

The circuit board is at a different point this time, but the idea is the same, hit it a couple times and it comes down opening a new path. Go through that path now. This will take you back to the very beginning.

Zero Gravity
Zero Gravity mission itself is basically identical to Biology A stage. However the way to start the mission is different this time.
So, remember the tall tower bumper that was blocking the way in the beginning? Yeah, that path is clear now. Take the lane and you'll end up triggering Zero Gravity mission.

This variation is actually easier compared to Biology A.
Optics A
Required missions:
Point Of No Return 1 Point Of No Return 1 Point Of No Return 1 Multiball 1 Multiball 2 Multiball 3 Zero Gravity
This stage is hard. Don't beat yourself for failing to complete this one (I've been there, just keep trying, you can do it!).
Start area
The place where you spawn when you start the stage. There are a bunch of SUPER MISSION hexagons here and one possible path to go, since the top part is blocked off. So go there, I guess :P

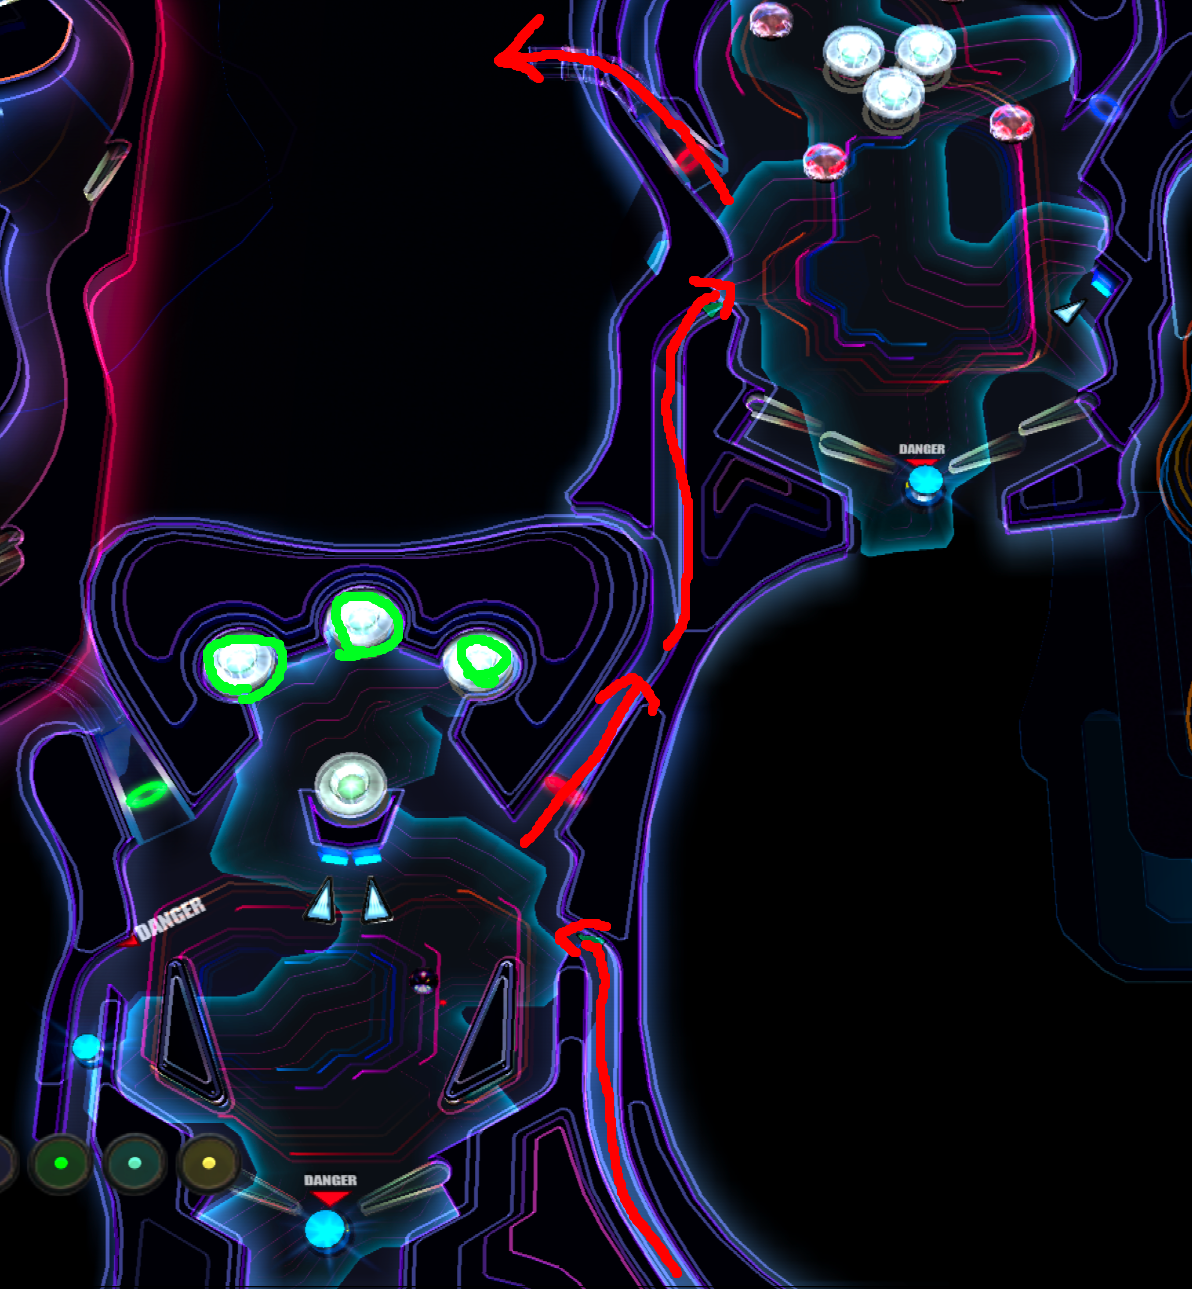
Point of No Return 1
Once you get out of the start area, you immediately see a moving plasma target. Hit it with your ball, that's going to trigger the Point of No Return mission.

There are a total of three PONR missions, the first one requires you to collect the following colors:
Red (found anywhere)Blue (found anywhere)Green (found anywhere)Cyan (found at the Loop The Loop area)Yellow (found at the Bumper Area)
And the ring colors change if you hit any of the flickering bumpers (except for Cyan and Yellow). So, first you need to hit the bumpers a couple times until the ring on the right path turns
Now you end up at an area with spinning spider crabs. Take the left path, you should end up in the Loop the Loop area.
TIP: Catch and hold the ball with the left-most flipper. This is the easiest way to aim the left lane.
Now you have a yellow mission to clear. Basically you need to hit center bumper in the middle a few times within the time limit. It's fine if you can't do it. Once the time runs or you finish the mission, aim for the top opening that you see at the end of the tunnel. The Cyan ring is right behind the center bumper (you can only see it for a few frames).


At the area you end up in, take the right path, you'll return to spawn point.
Take the only path again and hit the bumpers again, this time we want the right ring to turn
However, this time, take the right path. Ignore the message about the color not being needed (it should say you already have it). Now you're at an area with a bunch of crab babies. You can hit them once (or multiple times in the JP version) to destroy them and clear the path to the top openings (and go there ofc).
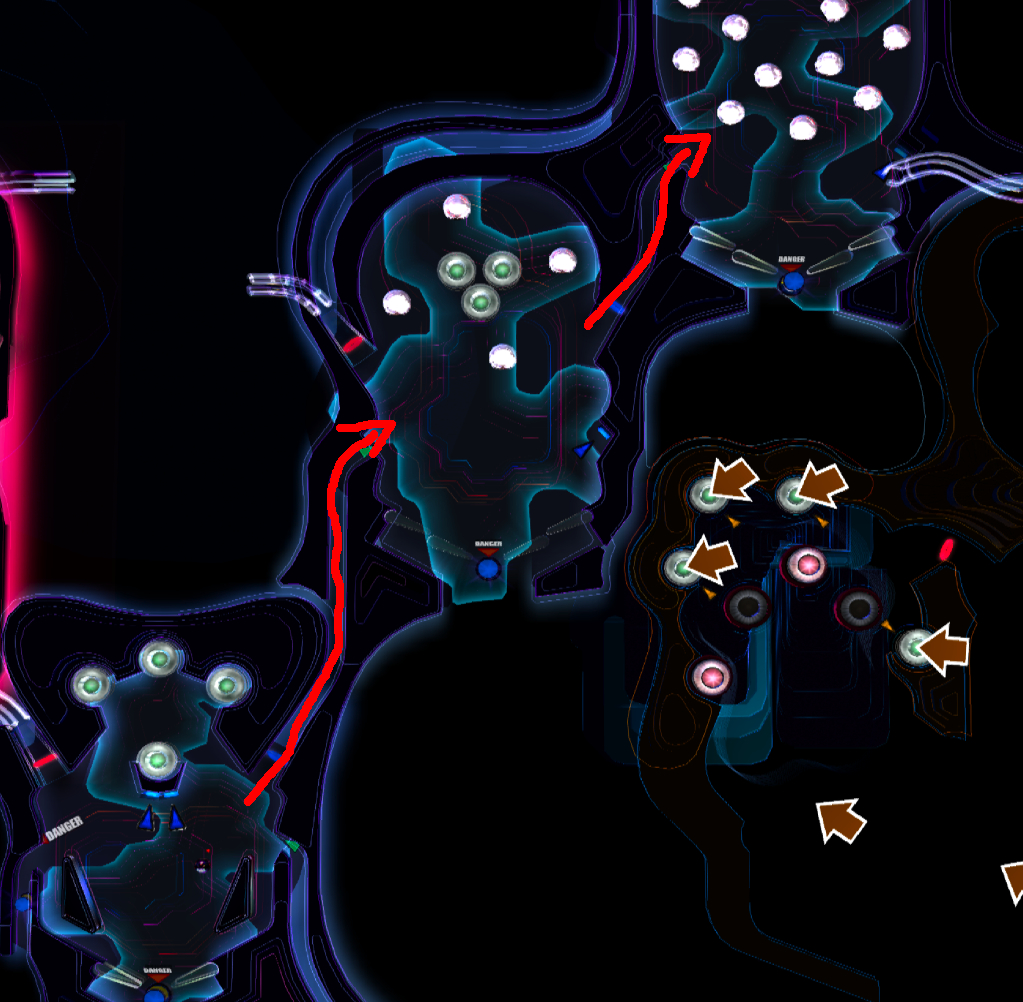
Now you need to get to the Bumper Area. Take the right lane and you'll end up there. The idea here is similar to Biology bumper area, you press the left buton to raise/lower bumpers. So, find the Yellow ring and take it (not difficult to find).

To exit bumper area, you have 2 options: lose your ball 2 times OR go to the very top and there is a lane you can move your ball to, which takes you back to the crab baby area. Once you exit the bumper area, you can take the left lane to go back to spawn point.
Multiball 1/2/3
If you return to spawn AFTER completing a Point of No Return mission, a Multiball mission is activated. There are a few variations on the gameplay, but the idea is the same:
You get three balls, one of them is orange
The path at the top is now open and you need to get there to hit bumpers
You have a time limit during which you have to perform your task and get bonus points
Once the time runs out or you complete a task, you get teleported back to spawn point and you can go and do the next PONR mission
The following variations exist:
Multiball 1: Hit all three bumpers a couple times and you complete the mission
Multiball 2: Hit each bumper to change its color, getting all colors to match gives you bonus points (ends when the time runs out)
Multiball 3: Bumpers change their color periodically, hit the red one a couple times to win
Point of No Return 2
The goal is to collect the following rings:
Red (found anywhere)Blue (found anywhere)Green (found anywhere)Cyan (found at the Loop The Loop area)Magenta (found at the Non-Stop Area)
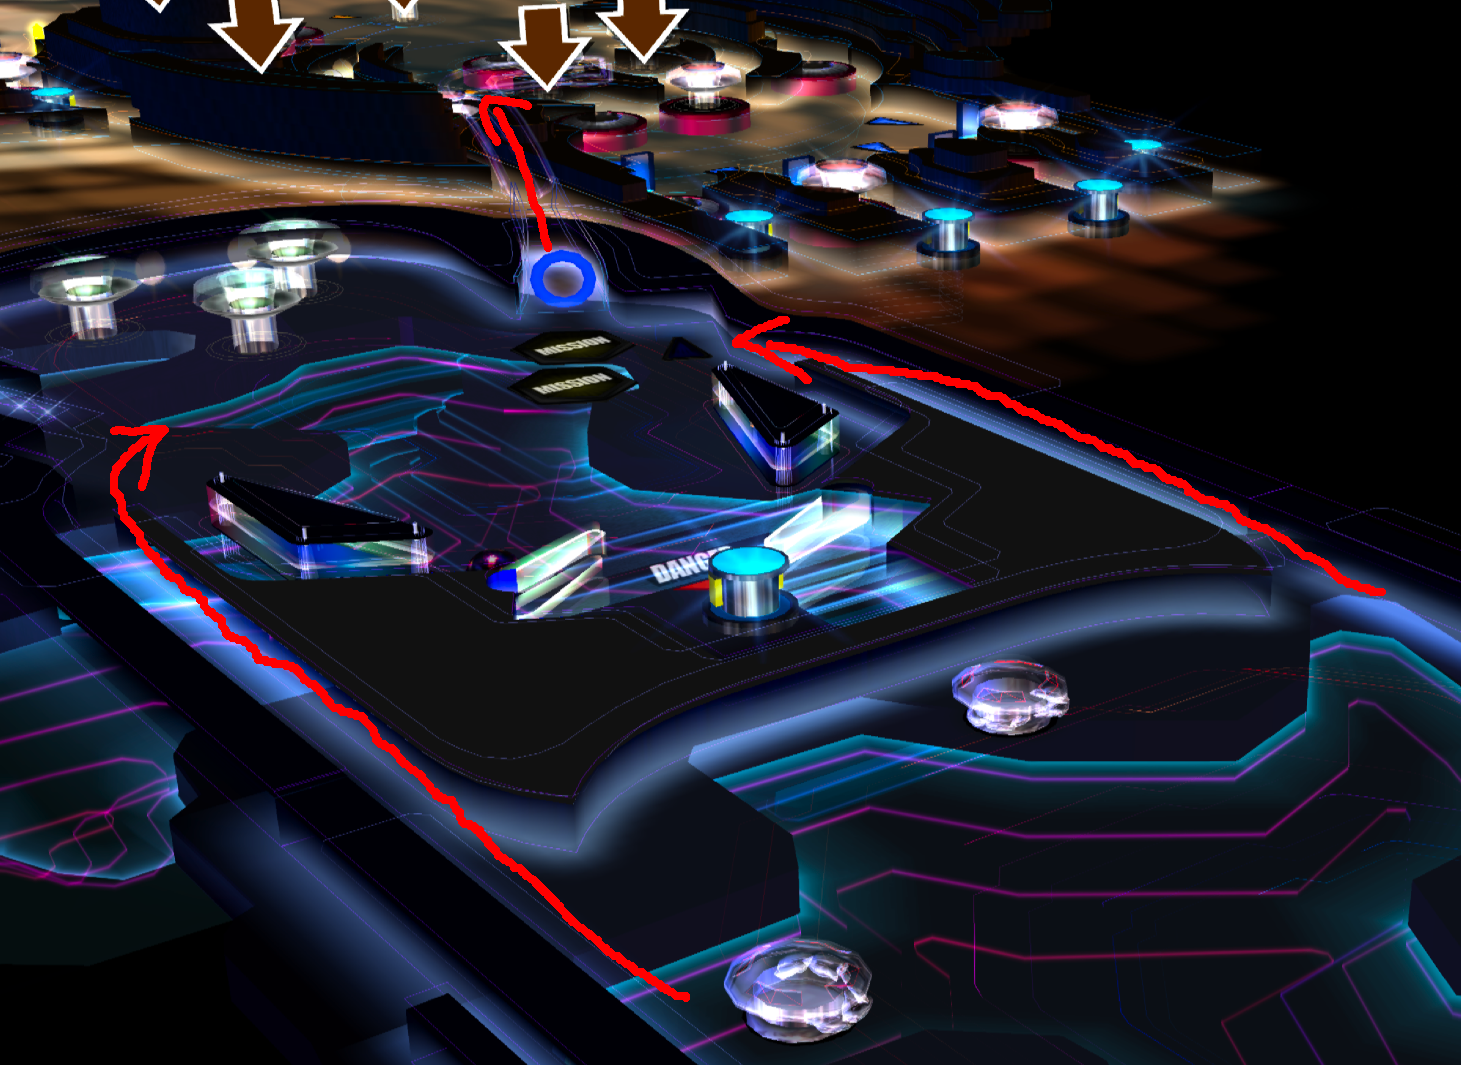
For this, I recommend taking this path from spawn: L-L (left-left)

This will take you to non-stop area. Immediately after your ball is dropped and at the bottom side of the right flipper, press
In case you miss, you can try to get the ball back up to the top right flipper and then attack, which hopefully gets you up there. If you fall to the very bottom, HOLD the LEFT flipper and when the ball reaches the very bottom edge of the flipper, flick it and you should be able to recover.
If you end up on the right section of the area, you can aim the ball to the top right flipper and when the ball reaches the bottom edge of it, press
When you successfully manage to escape the Non-Stop Area, you should end up in a transition area, where you have 2 sets of flippers. Hit the center bumpers until you manage to get the to be the same colors and collect the red, green and blue rings this way. Next, you need to get to the top flipper, which leads to the tunnel that takes you directly to the Loop The Loop area.

If you successfully manage to get there, you can play another round of loop the loop and once you finish, you can get the cyan ring. Go back to the spawn point to activate the next Multiball mission.
Point of No Return 3
The goal is to collect 5 red rings. The colors change automatically, so catch and hold the ball and attack once you see the right color. I recommend circling around by following the L-R-R-L path.
Zero Gravity
When you manage to complete ALL Point of No Return missions and at least start every Multiball mission, you'll get automatically teleported to the Zero Gravity area.
Other than a different color scheme, the idea of Zero Gravity stays the same. Bonus or no bonus, you unlock the next stage either way.
Biology B/Metallurgy B/Optics B
These are basically mirrored versions of the former stages. So you can follow the instructions from before, except when you're supposed to go left, you need to go right and vice versa. These stages also have a different color palette/aesthetic.
Geometry A
This stage is based on early electronic arcade pinball game simulators. Here's a list of missions you need to clear:
Space Warp Alien Hill Area 74 Galaxy Tennis
You can control the paddles, which the ball bounces on with the analog stick OR the DPad if you prefer.
Space Warp
The goal of this mission is to collect all the various keys scattered around the stage. You can locate them pretty easily, but some of them can be tricky to reach. Here are some tips:
The bottom left one is behind a bunch of purple arrows, which forcibly adjust the direction of your ball. You need to aim the ball between the two outer arrows a few times to get that key.
The right center key can be a little tricky too, you have to avoid all the purple arrows that are in the way.

Once you clear this mission, a bunch of green bumpers appear that your ball is attracted to. Once your ball is spinning around a green bumper, you can press

Area 74
After clearing space warp, a bunch of lanes are now visible. They warp you to the other side of the board. Go through these a couple times and increase the total lane counter (usually 7-10 times should be enough) and a flag will spawn. Hit the flag with a "74" written on it to start the Area 74 mission.


You'll be transported to an isolated area with UFOs attacking you. You have dual paddles, which you can use to control the ball. Once you destroy a UFO, the next phase of the battle begins. You need to get through the following phases:
1 UFO
1 UFO (hostile)
1 UFO (hostile)
2 UFOs
2 UFOs (hostile)
3 UFOs (hostile)

After beating all the UFOs, you complete the mission!
Alien Hill
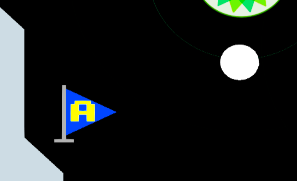
Just like Area 74, you need to increase the lane counter a couple times to get a flag to appear. This one should be blue and have the letter A on it.
This mission is basically an obstacle course, where you need to collect a bunch of blue keys, after which you can progress to the top. You need to do this 5 more times.

Once you get to the area with the blue bumper, there's a key at the very bottom. You need to drop your ball to one of the tunnels and let it hit the purple arrow in order to collect it. Your ball is repelled by the blue bumper, making it a bit difficult to get past.

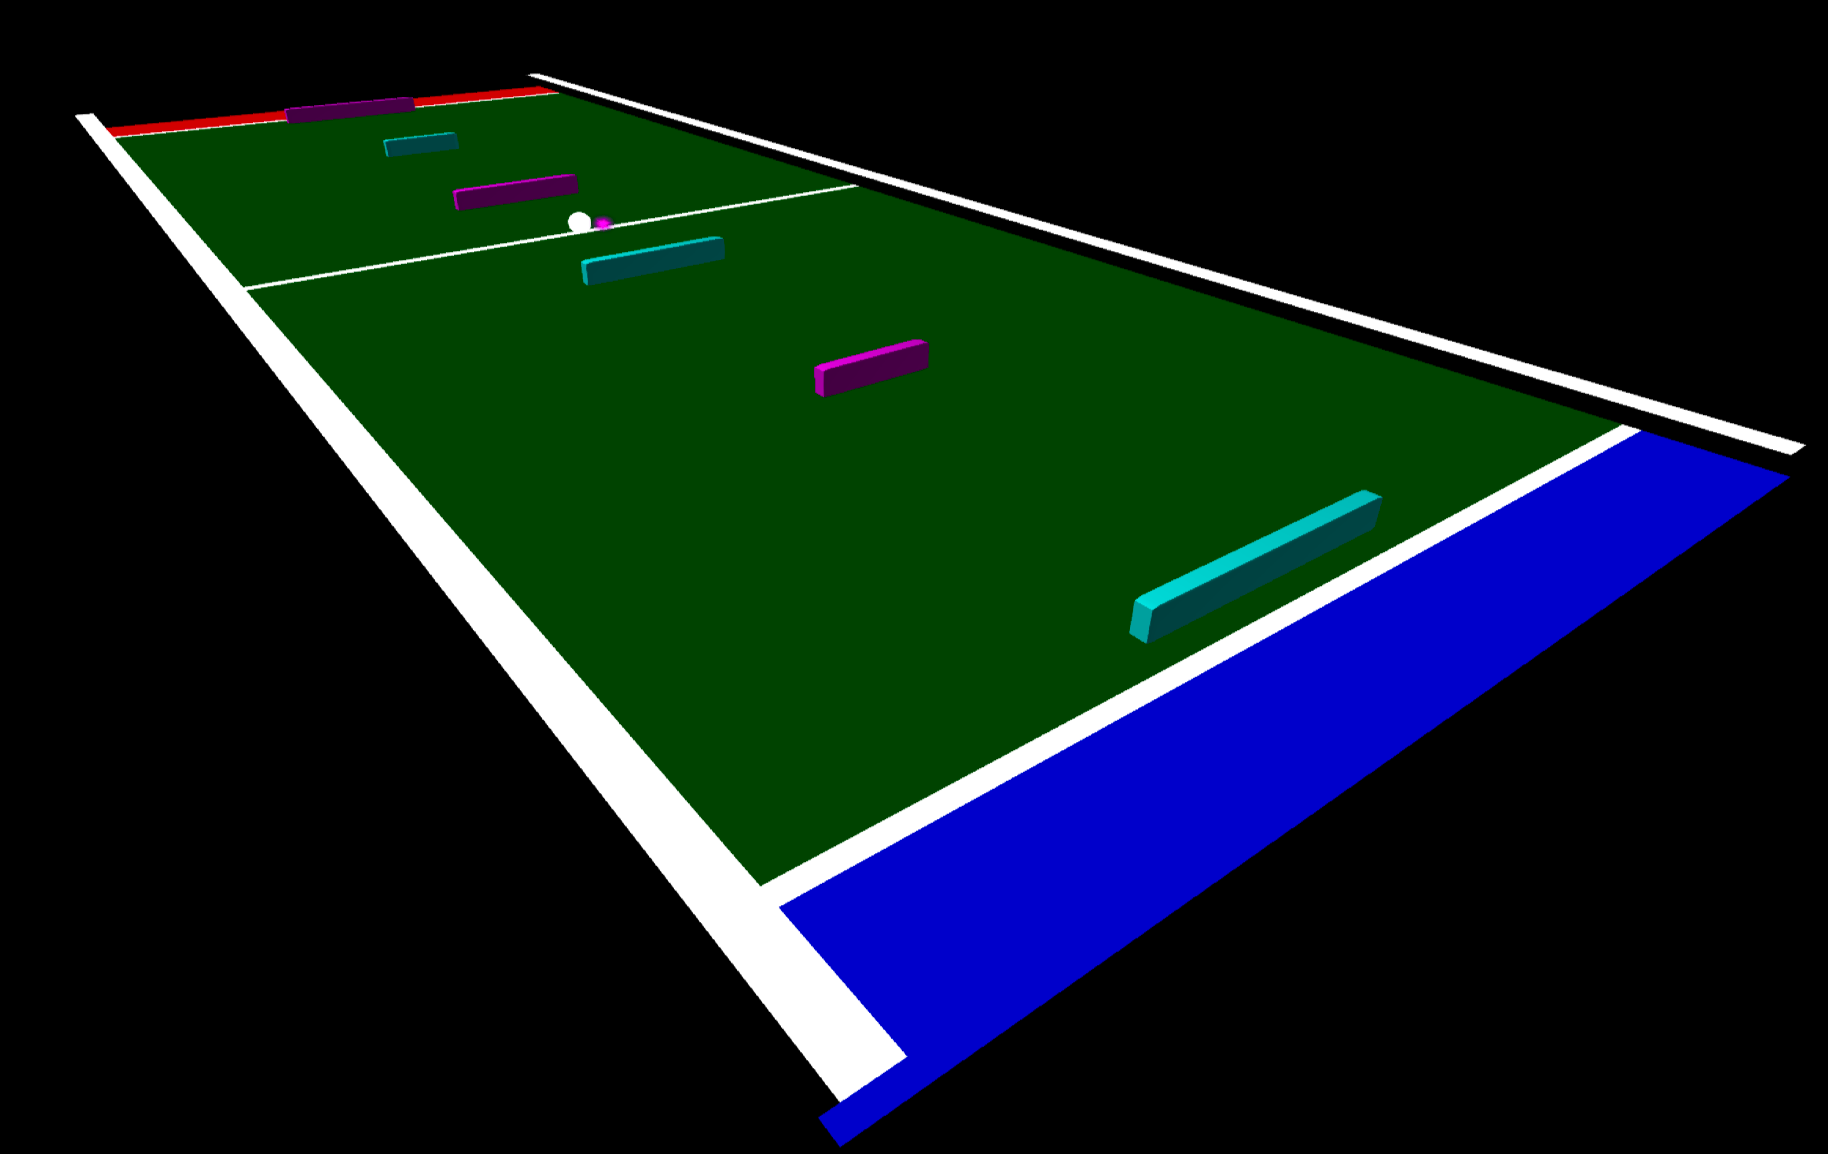
Galaxy Tennis
Once you complete both Alien Hill and Area 74 missions, a white flag with the letter E appears on the game board. Use the tunnel with 2 yellow blocks to reach it.

This is basically a pong clone, but you have some blocks behind you and the opponent, which need to be destroyed before one of the players gets a point.

Note: You don't need to destroy all the blocks, just enough that you can launch the ball into the void.
When you score, you take away health from the computer opponent and when they score, they take away your health. To complete this mission, you need to take away all HP from your opponent.
Exploits
Here is a list of some of the glitches and exploits I've found, which you should keep in mind:
Credits Warp - If you complete all stages, replay the "Evolution D" stage in original mode and once the stage loads, immediately exit. You should now see the end-game credits FMV.
Bumper Area no penalty respawn - In Biology stages, if you tilt the board, you respawn, but none of the triangle plates are re-lit, which the game checks for a Perfect Bumper village, so this exploits makes that particular missions much easier. Similarly in Optics, if you use tilt to respawn at the Bumper Area, you can bypass the forced removal from the area after 2 balls are lost.
Evolution no-clip - In Evolution stages, if two balls are on top of each other on a flipper, the bottom one falls through the flipper
Geometry no-clip - If you get the dark green paddle at a very specific angle, you can get the ball to ignore collisions.
Sound glitch - In Optics stages, when entering certain areas, the music can glitch out and some alien sounds may start playing. This lasts until you exit back to the menu.
Skip "You unlocked the next stage" cutscene - If you exit the stage right after entering the "Zero Gravity" area, the next stage will already be unlocked, letting you skip this cutscene. Note that this does not work on Geometry stage with the Gravity Tennis mission, the next stage will still be locked if you prematurely exit the current stage.